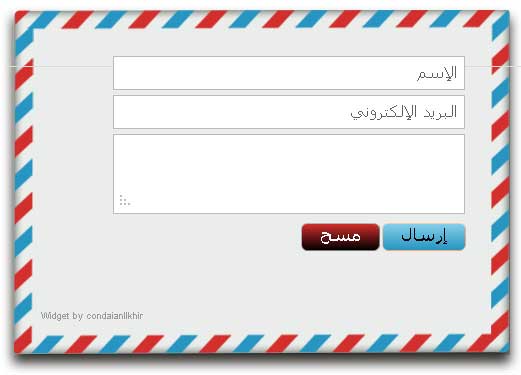
فى إطار التحديثات التى تقدمها جوجل لتطوير منصة بلوجر ، فقد قامت فى الآونة الأخيرة بتوفير نموذج الإتصال أو المراسلة من ضمن أدواتها وقد عرضنا بموضوع سابق كيفية إضافة نموذج المراسلة الرسمى لبلوجر بالعمود الجانبى لقالب المدونة.
ولكن يفضل كثير من المدونين تركيب النموذج بصفحة مستقلة أو مشاركة ، لذلك سأشرح طريقة إضافة النموذج الرسمى لبلوجر بشكل جديد ومختلف لصفحة مستقلة.
شكل نموذج الإتصال بعد تنسيقه والتعديل عليه

معاينة الإضافة
كيفية تركيب نموذج اتصال بلوجر فى صفة مستقلة
1. قم بتركيب الإضافة من أدوات بلوجر بالعمود الجانبى كما هو موضح بالموضوع السابق (تابع الشرح)
2.إضافة صفحة جديدة ثم أضف الكود التالى إلى وضع Html للصفحة
إنسخ الكود التالى كاملا
<style> .condaianllkhirform { background-image:url('http://download.mrkzy.com/u/1514_68cdc632e4051.png');background-repeat:no-repeat; margin: 50px auto; padding: 60px 10px 40px 10px; text-align: center; width: 530px; height: 350px; -webkit-padding-end:40px; } .contact-form-widget { max-width: 80%; position: absolute; right: 70px; width: 80%; height:100%; } .contact-form-name,.contact-form-email,.contact-form-email-message { border: 1px solid #BBBBBB; color: #605F5F; max-width: 80%; padding: 3px 5px 5px; width: 80%; font-size:16px; font-family: tahoma; text-align:right; } .contact-form-email-message { margin-bottom:10px; min-height:70px } .contact-form-email:hover, .contact-form-name:hover, .contact-form-email-message:hover { border: 1px solid #8F8F8F; color:#000; } .contact-form-button-submit { background: #85cfec;background: -moz-linear-gradient(top,#85cfec,#2895c0);background: -webkit-linear-gradient(top,#85cfec,#2895c0); border:0; color:#000; font-size:16px; padding:0 15px 26px; font-family: tahoma; box-shadow: 0 0 1px 0 #F86401; border-radius:5px; } .contact-form-button-submit:hover { background:#85cfec; border:0; color:#000; box-shadow: 0 0 1px 0 #F86401; border-radius:5px; } #ContactForm1_contact-form-submit2 { background: #000;background: -moz-linear-gradient(top,#d22e2c,#000);background: -webkit-linear-gradient(top,#d22e2c,#000); box-shadow: 0 0 1px 0 #000; color:#fff; font-size:16px; padding:0 15px 26px; font-family: tahoma; border:0; border-radius:5px; } #ContactForm1_contact-form-submit2:hover { background:#424242; box-shadow: 0 0 1px 0 #000; color:#fff; border:0; border-radius:5px; } </style> <br /> <div class="condaianllkhirform"> <div class="widget ContactForm" id="ContactForm1"> <div class="contact-form-widget"> <div class="form"> <form name="contact-form"> <div style="text-align: right;"> <input class="contact-form-name" id="ContactForm1_contact-form-name" name="name" onblur="if (this.value == "") {this.value = "الإسم";}" onfocus="if (this.value == "الإسم") {this.value = "";}" size="30" type="text" value="الإسم" /> </div> <div style="text-align: right;"> <input class="contact-form-email" id="ContactForm1_contact-form-email" name="email" onblur="if (this.value == "") {this.value = "البريد الإلكتروني";}" onfocus="if (this.value == "البريد الإلكتروني") {this.value = "";}" size="30" type="text" value="البريد الإلكتروني" /> </div> <div style="text-align: right;"> <textarea class="contact-form-email-message" id="ContactForm1_contact-form-email-message" name="email-message" onblur="if (this.value == "") {this.value = "اكتب رسالتك هنا";}" onfocus="if (this.value == "اكتب رسالتك هنا") {this.value = "";}" value="اكتب رسالتك هنا"></textarea> </div> <div style="text-align: right;"> <input class="contact-form-button contact-form-button-submit condaianllkhir-button-color" id="ContactForm1_contact-form-submit" type="button" value="إرسال" /> <input class="contact-form-button contact-form-button-submit condaianllkhir-button-color" id="ContactForm1_contact-form-submit2" type="reset" value="مسح" /></div> <div style="max-width: 222px; text-align: center; width: 100%;"> <div class="contact-form-error-message" id="ContactForm1_contact-form-error-message"> </div> <div class="contact-form-success-message" id="ContactForm1_contact-form-success-message"> </div> </div> </form> </div> <span style="font-size: xx-small;"><br /></span> <span style="color: #999999;"><span style="font-size: xx-small;"><br /></span> </span><br /> <div style="text-align: left;"> <a href="http://www.condaianllkhir.com/" target="_blank"><span style="color: #999999;"><span style="font-size: xx-small;">Widget by </span><span style="font-size: xx-small;">condaianllkhir</span></span></a></div> </div> </div> </div> </div>
3. الآن لدينا نموذجين للإتصال، لإخفاء نموذج الإتصال الذى يظهر بالعمود الجانبى إذهب إلى تحرير القالب
ثم إنتقل إلى أداة contact Form 1 ثم قم بتوسعة كود الأداة عن طريق الضغط على الأسهم السوداء
ثم إحذف الأكواد الموجودة بين هذين الكودين
<b:includable id='main'>
</b:includable>
كما موضح بالصورة

يجب ملاحظة أن أداة contact Form 1 لابد أن تأخذ رقم 1 وإن إختلف الرقم قم بتبديله إلى رقم 1 .


0 التعليقات:
إضغط هنا لإضافة تعليق
إرسال تعليق
Blogger Widgets